Quickstart for AWS
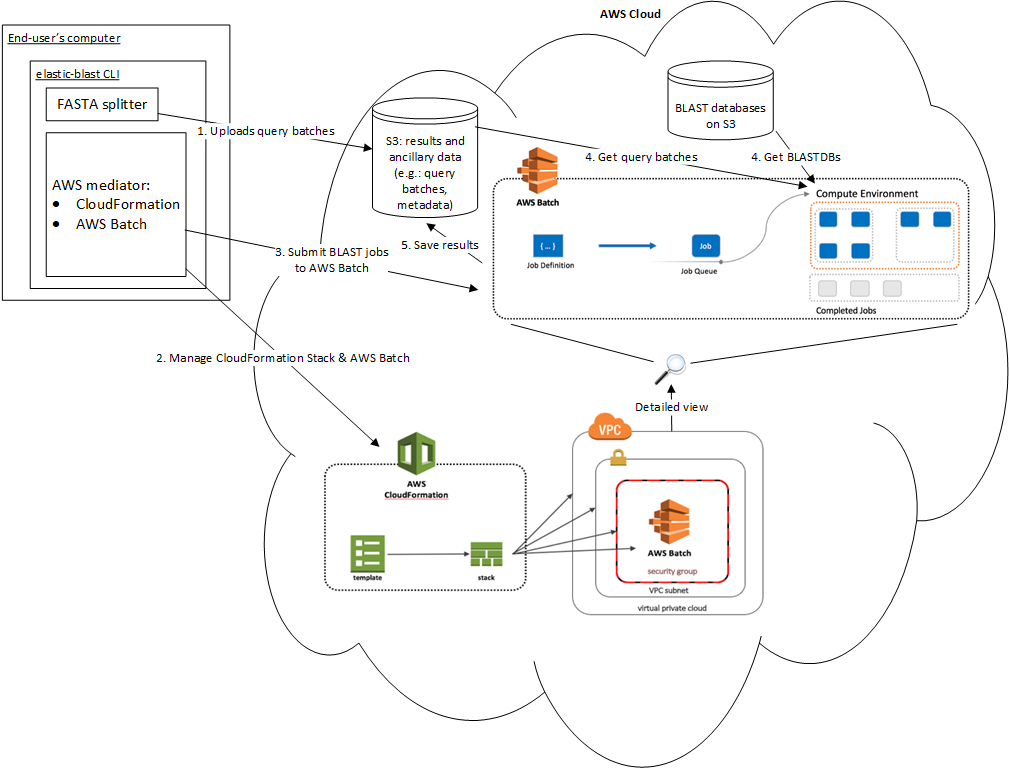
Overview of ElasticBLAST on AWS
Get ElasticBLAST
curl -sO https://storage.googleapis.com/elastic-blast/release/0.0.17/elastic-blast
curl -sO https://storage.googleapis.com/elastic-blast/release/0.0.17/elastic-blast.md5
md5sum -c elastic-blast.md5
chmod +x elastic-blast
# Optional: move elastic-blast to the desired installation path
The code examples below assume that ElasticBLAST was installed in the current working directory and that the requirements have been met.
Set up an output bucket (if one doesn’t exist)
aws s3 ls s3://elasticblast-${USER} || aws s3 mb s3://elasticblast-${USER}
Provide AWS credentials
If not already present, please please provide your AWS credentials. This can be
accomplished by setting up environment variables or by saving those values in
~/.aws/config. Please see examples below:
# Environment variable
export AWS_ACCESS_KEY_ID=<YOUR_ACCESS_KEY_ID>
export AWS_SECRET_ACCESS_KEY=<YOUR_SECRET_ACCESS_KEY>
# Check whether an AWS configuration file already exists
[ -f ~/.aws/config ] || echo "AWS configuration file already exists!"

# If not, enter the following information in it
[ -d ~/.aws ] || mkdir ~/.aws
echo '[default]' > ~/.aws/config
echo 'aws_access_key_id = <YOUR_ACCESS_KEY_ID>' >> ~/.aws/config
echo 'aws_secret_access_key = <YOUR_SECRET_ACCESS_KEY>' >> ~/.aws/config
Configure it
The minimal configuration requires:
AWS region to run ElasticBLAST on (
us-east-1recommended, see AWS configuration for additional details),query sequences in a single file or tarball,
a cloud storage bucket for results. This value must start with
s3://.Number of worker nodes to start.
They can be provided on a standard ini configuration file, e.g.:
1 2 3 4 5 6 7 8 9 10 11 12 13 | [cloud-provider]
aws-region = us-east-1
[cluster]
machine-type = m5.8xlarge
num-nodes = 1
[blast]
program = blastp
db = swissprot
queries = s3://elasticblast-test/queries/BDQE01.1.fsa_aa
results-bucket = ${YOUR_RESULTS_BUCKET}
options = -task blastp-fast -evalue 0.01 -outfmt 7
|
In addition to the minimal parameters, the configuration file above includes some BLAST options. See Configuration variables for details on all the configuration parameters.
Run it!
./elastic-blast submit --cfg ${CONFIG_FILE} --loglevel DEBUG
NOTE: currently you can only have one ElasticBLAST search running at a time.
Monitor progress
To check on the progress of the search, inspect the logfile
(elastic-blast.log by default) and/or run the command below:
./elastic-blast status --cfg ${CONFIG_FILE} --loglevel DEBUG
The status command will not return proper results until the submit command has finished.
You can also visit the web intefaces for CloudFormation and Batch to monitor the progress of your cloud resource creation and jobs respectively.
Problems? Search taking too long? Please see Support.
Get results
Run the command below to download the results.
Note: this command requires the AWS CLI SDK.
aws s3 cp ${YOUR_RESULTS_BUCKET}/*.out.gz .
Clean up
This step is critical, please do not omit it, even if you ran Ctrl-C when starting ElasticBLAST. If you do not clean up your cloud resources, you will accrue charges from your cloud service provider. It is also recommended each time you start a new ElasticBLAST search.
./elastic-blast delete --cfg ${CONFIG_FILE} --loglevel DEBUG
The delete command will take a few minutes to run as it needs to manage multiple cloud resources.
You may verify that your cloud resources have been deleted by running:
aws cloudformation describe-stacks --stack-name elasticblast-${USER} --output text
aws ec2 describe-instances --filter Name=tag:billingcode,Values=elastic-blast Name=tag:Owner,Values=${USER} --query "Reservations[*].Instances[*].InstanceId" --output text
These commands will show the CloudFormation stack created by ElasticBLAST by default as well as the instance IDs of the EC2 instances it created.
AWS Configuration
The minimum required configuration parameters for running ElasticBLAST in AWS include:
In addition, you must have the necessary credentials and permissions to run the AWS services required by ElasticBLAST.
If you are new to AWS, please review and follow the instructions in the link below: